Help keep these and future patterns FREE! Click here to support my work with a small donation.

Search My Blog for Patterns

Search my blog for patterns
Showing posts with label epatterns. Show all posts

Tuesday, 30 August 2022

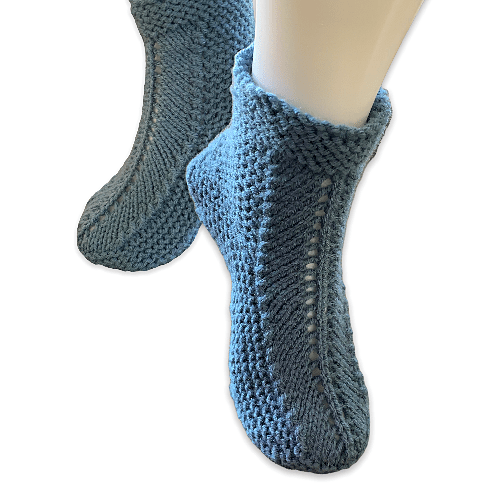
Learn to Knit Slippers With These Patterns

Do you love to knit?  Are you looking for a variety of different styles of slippers you can make?  I listed all of my slipper patterns in one convenient place.

All of the knitting patterns are written out in full on my website at Kweenbee.com. If you would prefer to have a downloadable version that you can print, you can do so from my online shop here - Download Patterns. All of the PDF downloads are very reasonably priced at $2.99 USD.

Don't feel comfortable downloading patterns from my website and prefer Etsy or Ravelry? These are handy options if you have previously downloaded patterns through these fine distributors.  

All the links below take you to my online shop and the free online version. And don't worry, you won't lose this page. Any link you click will open in a new window.

Easy to Knit Beginner Slipper Pattern - Knit Flat with Bulky Yarn on Straight Needles

Read online


If you are looking to make slippers fast and thick, this is the pattern for you! For this pattern, I’ve designed it so you can use either 2 strands of worsted weight yarn (10 ply or No. 4 yarn) or you can use super bulky yarn (14 ply or No. 6 yarn). The number of stitches and rows per inch is quite low, so they work up very quickly.


The pattern is knitted flat on 1 set of 5 mm (US size 8) single pointed needles. The pattern itself only involves basic stitches including the knit and purl stitch, k2tog, P2tog and casting on stitches. Easy peasy! For real. This is a great knitting pattern for beginners!


Bulky Yarn Slippers on Straight Needles – FREE Knitting Pattern


This knitted slipper pattern makes for a quick to knit, extra thick slipper with minimal seams. The top is joined to the sole as you knit the sole of the slipper.


This is not a pattern for beginners, but easy to do if you have some knitting experience. Photos are supplied to clarify any confusing parts of the design.


This pattern gives instructions to make slippers from a woman’s size 6 to a man’s size 12.


You can use either 2 strands of worsted weight yarn or Super Bulky yarn. Both will work for this pattern.


Minimalist Round Toe Slippers
Download or Read Online

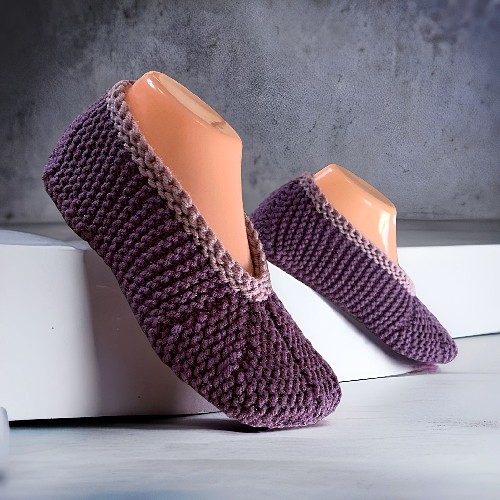
Knit flat on two straight needles, the rounded toe portion is created using short rows. Easy to make and fits great. 


Chevron Striped Moccasin Slippers

Download or Read Online

moccasin slippers - free knitting pattern

This is another version of my very popular Adult Moccasin Slippers. I thought I’d jazz these slippers up a bit by adding some details to the top of the toe with a striped eyelet/chevron combo. I also made the cuff a little longer to fit even more like a bootie. I like how the final product turned out and is very gender neutral.


Knitted Slippers for Children - FREE Knitting Pattern

Read Online There is no download for this pattern

The child size version of the moccasin slippers below, these slippers are designed to fit the smaller folks. They fit from a small child's size 1 to a pre-teen size 5. It's a large range.

Moccasin Slippers with a Cuff – Knitting Pattern


Knitting Pattern - Mocassin Slippers

This is the simplified version of my very popular Knitted Owl Slipper Pattern. I realized that not everyone may want owls on their slippers. That a more plain slipper was something that any man, woman or child would wear as plain old knitted slippers. 

The pattern is knitted on 2 (two) set of needles, but don’t worry. I’ve provided a bunch of photos to show you how to do this. It sounds more complicated than it really is. The pattern itself only involves the knit stitch, k2tog and picking up stitches. Easy peasy! For real.


Knitted Owl Slipper Pattern


Knitting Pattern - Owl Slippers

Awesome cozy slippers with a delightful cable owl motif. The inspiration came to me while scrolling through the wonders of the internet and stumbling on slippers that were made on in one piece on circular needles but back and forth. I couldn’t for the life of me figure it out, the pattern wasn’t in English, so I decided to design my own!


I designed these slippers to fit women from a size 6-13 and men from sizes 7-12.

Please take note, this is not a pattern for beginners. I used a very different technique involving 2 sets of single pointed needles. I included photos to demonstrate how I’m using the extra set and it totally works! Trust me.


Knitted Adult Slippers with a Plaid Pattern


Knitted Slipper Pattern
A great knitting pattern for beginners and experts alike! The stitches and techniques used to make these simple looking slippers are very basic. As long as you can cast on, knit, purl, and the like, you’ll be able to make these with no problems whatsoever. If you’re a more experienced knitter, you’ll be able to whip up a pair in no time!

How to Knit Children’s Slippers


Child Knit Slipper Pattern

I’ve been asked by a number of people to convert my knitted adult slipper pattern to child sizes and as promised, here it is! I’ve made the pattern fit children’s feet from a small size 5 up to a teen size 5. That means you can make a slipper to fit feet that measure 5 1/4” to 9” long. Anything larger than that can be made with my other free pattern entitled How to Knit a Pair of Slippers.


And just like that pattern, I’ve included links to all the knitting stitches you need to make the slippers. By clicking the links you’ll go to the YouTube video and I will show you how to do the required stitch or technique.


You can also watch a my video on YouTube that shows how to make these slippers from casting on to sewing up the seams here: How to Knit Slippers for Children and Adults


How to Knit Adult Slippers


Adult Knit Slipper Pattern

One of my most favourite things to knit…slippers just like Grandma used to make. I designed the pattern so any one can create them for adults from a woman’s size 7-12 or a man’s 6-11.


This is a great pattern to practice if you are a new knitter as it only uses very basic stitches. Even if you have never knitted before, you can learn how to knit these slippers by following the complete how-to YouTube video, How to Knit Slippers for Children and Adults, showing every step from casting on to sewing up the seams.


How to Knit Adult Bootie Slippers


Adult Knit Slipper Pattern

One of my more popular knitted slipper designs because of the cuff. The sizing for these beauties is for a woman’s size 6 - 11 and a man’s size 5 - 10.


Using basic stitches and common techniques, the final product makes a comfortable slipper with a longer cuff ensuring that they will stay snuggly on your feet. There is now a companion how-to video available on YouTube entitled How to Knit Adult Bootie Slippers. This video shows how to make the entire slipper from casting on to sewing up the seams.


How to Knit Adult Ribbed Bootie Slippers


Knit Slipper Pattern for Adults with a Cuff

I designed these bootie slippers to be as easy to knit as possible. They are knit flat with no extra needles or special techniques required. If you know how to cast on, purl and knit you will be more than capable of finishing these for yourself or someone else!


The pattern is written to fit feet from a ladies size 6 – 12 and a man’s 5 – 12.


Cable Knit Slippers


Knit Slipper Pattern for children and adults
Learn to knit comfy, cozy cabled slippers. This pattern shows you how to make slippers for children from a small size 3 to a large 3, and a woman's and man's size 4 to 12. A great project for a knitter with some experience but wanting to make something that is a little more challenging,. Even if you have never knit a cable before, have no fear! This pattern includes detailed instructions and numerous photos demonstrating how to create the cable.

Easy to Knit Bow Slippers


knitted slipper pattern with bowsBy far my most popular pattern is my bow slippers. You can make them from a child size 9 to a woman's size 12.  The slippers are very easy to make and I've added links to videos on YouTube demonstrating how to do the basic stitches.  I've also included detailed photos of the step by step process to make the bows.  This makes these slippers a fairly easy project and great for a beginner knitter who knows the knitting basics but wants to challenge him or herself a bit.


Easy to Knit Slippers


Easy Slipper Pattern to Knit
Another best seller.  Like the bow slippers, it only uses very basic stitches yet enables you to make a wonderful pair of adult slippers from a woman's size 6 up to a man's size 14.


How to Knit Slippers Just Like Granny Made


Knitted Slipper Pattern for Adults
My very first slipper pattern that I published. This pattern includes instructions to make slippers that will fit adults from a woman's size 7-12 and a man's 6-13.  It is a bit more difficult because the cuff is knitted on double pointed needles in the round.  It sounds complicated but if you can knit a pair of socks, then you can easily make the cuff too!


Two Slippers with One Pattern


How to Knit Slippers
What a bargain on this one!  Using the same stitches you can knit what looks like two very different slippers.  The stitches are pretty basic, but like the pattern listed above, it involves picking up stitches and making a cuff on double pointed needles.  It may sound tough, but picking up stitches is pretty easy and knitting on double pointed needles is the same as single point needles.  You just don't flip your work.  

The pattern is for slippers from a men's size 6 to 13 and for a women's 6 to 13.


How to Knit Sheep Slippers

Download or Read Online

Knitted Sheep Slippers PatternDefinitely more of a challenge, these slippers are perfect for someone very comfortable making socks.  The pattern includes detailed photos of how to make the fluffy wool like stitch. Knitted in the round on 4 double pointed needles.


Designing slippers is kinda "my jam" and I tend to do so on a fairly regular basis. I'll add new patterns to this blog post as I get time.


Happy knitting!!!

Thursday, 1 December 2016

Free Knitting Patterns

Welcome to my all-inclusive page for ALL of my FREE knitting patterns! Here you will find each and every knitting pattern that I've published to date. Each pattern includes a picture and links to my website where you can read it online or download it through the distributor you trust the most.

A little bit of info before you quickly scroll down the page and go clicking all willy nilly on my links. All of these knitting patterns are on my website at KweenBee.com. All of these knitting patterns are written out in full on my website free for anyone to use. These free knitting patterns are ad supported.

If you are looking for the PDF version without ads, you can download it from either my website KweenBee.com, Etsy or Ravelry (when available). Downloads are available at a very reasonable 99¢. 

PDF's work on EVERY device but you'll need to have the Adobe Reader installed. When you open the file after you download it, your device or computer will prompt you to download the app from the appropriate app store if you haven't downloaded it already. If you've downloaded other patterns online, chances are you have it already.


I truly hope you enjoy these patterns. And as a quick note...whether my patterns are free or purchased you have permission to sell whatever physical items you make (slippers, mitts, socks, etc.) but you are NOT permitted to claim the patterns as yours or redistribute them in any format. Please download additional copies as needed.

Happy knitting!

Knitted Owl Slipper Pattern


Hipster Wine Cozy

Adult Bootie Slippers


Knitted Adult Slippers with a Plaid Pattern


Simple to Knit Ribbed Slippers

Read the full pattern online

Download the pattern

Texting Mitts


More of my patterns for sale on Etsy

Children's Slippers


Socks


Netflix & Knit...this Scarf


Fun and Easy Monster Purse

Flip Mittens or Fingerless Gloves


Pair of Adult Slippers


Help Support My Work


For as little as 
$12 a year
you can help support my work with 
a small monthly payment through PayPal.

Monday, 6 May 2013

Crocheting Meets Jewelry - My Latest Bracelet Tutorial

crocheted bracelets
After a bit of creative tinkering I've come up with yet another pattern.  This time it is a combination of two of my favourite hobbies, crocheting and jewelry making. 

crochet braceletBut a little about my latest pattern.  I've been going through a bit of a creative period lately, and coming up with all sorts of different ideas for things.  This one was inspired by a crochet trim pattern I found in an old pattern book.  It didn't have any beads or an edging of any sort but developed into a new bracelet.  

crochet bracelet patternThe first couple bracelets I made were all one colour and pretty blah.  They had potential but needed a little extra to add a bit of proverbial spice.  I played around a bit and added some beads to the ladders.  Not bad I thought, but still not quite enough.
 
So as I was finishing off one bracelet and I thought it would be a good idea to incorporate the edging of my other crocheted bracelets.  Now I was cooking with gas as my grandfather used to say! 


And then I was searching through my stash of beads and found the butterfly charms I had ordered from eBay years ago.  That led to what I really think is the best version of this bracelet yet.
I've added the pattern to my website as instant downloads.  I've called it Beads and Ladders Crochet Bracelet.  I know some people find individual websites sketchy so I also have it for sale in my Etsy shop as an instant download and as an email I can send to you.  It's also available at Amazon and should be hitting the digital bookshelves in all the other retailers like Barnes & Noble, iBookstore, etc. very soon.  My distributor is in the process of submitting to these retailers. 
 
The coupon code will only work on my website.  The others either don't allow for discounts or are too general to be applied only to my patterns.  Sorry but it's the best I can do.
 
Love the bracelet?  I have the exact butterfly bracelet for sale in my Etsy shop right now!  It's one of a kind so you'd better act fast before it's gone.


Sunday, 28 October 2012

Self-Publishing Your Patterns and How-to's (Pt. 6)

This is for those who are publishing through Amazon and Smashwords and DO NOT have US bank accounts.  As a Canadian citizen, I only have bank accounts here.  What this means, is that by law, because both of these companies are operated in the United States, they must retain 30% of my earnings to remit to the IRS.  This sucks since I'm not American.  I already have to pay the taxes on my earnings to Revenue Canada and I'm getting dinged twice.  Let me tell you how hard that sucks!!!

There is a process, that as a foreigner, I can go through to get this money back.  It involves filling out forms, providing notarised id, and an awful lot of patience.  I haven't started this myself yet but I have started doing some basic research on it.  I'm assuming that this is the same process regardless of the country you live in be it UK, Mexico, Australia, etc.

Two places that I found invaluable information are on the Smashwords website at the following link.  It's under the heading: Are there tax withholdings on my earnings if I reside outside the United States? in their FAQ section.  The link should take you automatically to the right spot on the page.


Another page that I found very helpful was written by a lawyer and the link was posted in the Amazon KDP forums.  It's called How to Obtain a U.S. Individual Taxpayer Identification Number (ITIN) - By Richard P. Clem, Attorney .  It's very easy to understand and gives great insight to the process and the article links to all the places that you need to go like the IRS pages.

I'll keep everyone posted on how I make out on my claim to my tax withholdings.  I'm going to start once the Christmas rush is over some time in the new year.  From what I understand, and I may be wrong, you can make a claim for your tax withholdings on the previous years, so I'll be out nothing if this works.

To see the previous instalment of my self-publishing information, please see this article Self-Publishing Your Patterns and How-to's (Pt. 5)

Sunday, 7 October 2012

Self-Publishing Your Patterns and How-to's (Pt. 5)

Ok.  So this posting isn't so much about self-publishing but more like how to go about generating a little more revenue from your patterns.  The way to do this is through affiliate programs.  Now there are lots of websites and blogs out there that can give you a whole lot of information about this topic, but here's the jist of it.  You can make money from generating sales through your blog or website.  You get a percentage of the sale as long as the purchase is made within a given period of time.  It usually is a few days, but depending on the company could be longer.  Each affiliate program is different and you'll have to read their TOS (Terms of Service) for the details. 

So here is what I'm doing...I joined the iTunes affiliate program to promote my patterns even further and make a little extra on each sale.   See this link

Janis Websdale

on the left hand side? That's a direct link to my patterns I'm selling through the iBookstore. Pretty cool huh?

Now also with this I can promote other people's patterns too.  According to my blog stats, the majority of folks are coming to my site to see my knitting patterns.  Therefore, it would serve me well to add a widget where all sorts of knitting patterns and how-to's are listed.


And there it is!  It really is super simple to do.  iTunes gives you the code and all you need to do is copy and paste it where ever you like on your blog or website.  It takes care of itself from there.

So how did I become a member of the iTunes affiliate program?  First I had to join LinkShare.  Once I was accepted into their affiliate program I could then pick and choose what companies I would like to work with.  They work with a bunch of companies selling all sorts of stuff online.  LinkShare then compiles everything into one place. It makes it easy to work with and collect the money that I earn.

LinkShare_180x150

And what's even more cool, if you click that box right above here and join their affiliate program, I can make money from your referral! You can do the same on your blog or website too! It's just the gift that keeps on giving.

And it's not just iTunes that has affiliate programs. Amazon does the very same thing though they run their program themselves and not through any other partners.  If you're interested in joining that one you can try this link...become an Amazon Associate.

These are the ones that I've signed up for but you may want to look for others.  I would love to get a little feed back on this and if you have any suggestions to other programs, by all means, let all of us know!  Give your suggestions in the comments section.

Friday, 16 March 2012

Self-Publishing Your Patterns and How-to's (Pt. 4)

A while back in Part 2 of this series, I let everyone know that I was going to give Amazon Prime a shot. For a publisher, this is listed as the KDP Select program.  Here is my update on the outcome.  I let my ring tutorial run for the three month period and was disappointed in the numbers of borrows that I had on it.  I've now taken it off of their system and added it to Smashwords to get it listed in all the other formats like Barnes and Noble, iBookstore, Nook etc.  I'm going to let it run for the three month period and see how my overall sales go.  I've done very well over the last three months on Kindle and I'm not sure if offering my patterns for free on Amazon Prime helped with boosting my sales or not.  All I can do is give it a test and see how it all turns out.

I also discovered that I had downloaded a program to convert Word documents into PDFs for free and never shared it with anyone.  How rude of me, I know.  Anyways, it's called PDFConverter Desktop 1.0 Beta and is a file that you download onto your computer and use offline.  Since I already have spoken so highly of OpenOffice (still free and AWESOME), I will tell you how to use PDFConverter in conjunction with it.  I haven't tried it with Word so I don't know if it will work.  Let me know if you've had any success with it.


Just a quick heads up; PDFConverter doesn't actually give you a nice icon or anything to click on to run the program.  It just magically appears as new options in the OpenOffice program.  I have no idea how that works but it does.

As promised here are the instructions:

1) Click File

2) Click Export PDF

When you are at this stage you can set permission passwords and such. You may want to but if you are going to upload it to ebook distributors or send it as attachments to your customers, you'll want to avoid this. I just click Export.

3) Name your file and click Save. Now your done.

Pretty simple huh?! That's why I like it so much.

I like how simple it is to use these two programs together. It is very easy to set your page layout to look the way you want. Sometimes the spacing can be weird and the photos will be forced onto the next page while the instructions are on the previous page. This drives me nuts and I always fix this. The program saves the file so it looks exactly the same when it is made into a PDF. Some online converters don't do that and you end up having to change the layout of the document over and over again. It frustrating and a huge time waster.

So that's all I have for now.  I'll keep everyone posted on how my publishing journey goes.  Good luck to all of you out there.  I'd love to hear how you are doing.

Wednesday, 25 January 2012

How to Knit Socks

knitted socks
Another one of my favourite things to make, socks! They are one of those things that you can make as individual as you are.  

This pattern has moved!! If you wait 10 seconds you will automatically go there.


If you are out of patience, you can also


Thursday, 5 January 2012

Self-Publishing Your Patterns and How-to's (Pt. 3)

This is not so much of an informational post, but more of a general update.  In my last post about my publishing adventures, I was a bit disappointed with the outcome of my pattern sales through Smashwords.  Well, now that the quarterly report is out my tune has changed.  Turns out the tracking of the number of copies sold only pertains to the copies sold through Smashwords directly and not the other devices I'm selling on.  So it turns out that I've now sold 8 copies through Apple and 1 through Smashwords.  Granted this isn't the as well as I'm doing on Kindle, but still, a sale is a sale.

I was also recently contacted by a woman who bought her copy through Barnes and Noble, so I now have nothing bad to say about the service at all.  Patience is a virtue after all and I got to practise it yet again.


I did notice when I was going through my patterns through the retailers that the search terms may be a cause of my low sales numbers.  I've updated my category listing and keywords through Smashwords and now have to wait for them to be updated everywhere else.  Hopefully this will help.

I've also decided to try offering my slipper pattern for free.  If you are interested in other free books that are on Smashwords, you can try this link www.free-ebook-downloads. It will give you all the free ebooks in the art section.

To start at the beginning of my self-publishing journey, you can go to my first post in the series The Art of Self-Publishing Your Patterns & How-to's.

Wednesday, 21 December 2011

Self-Publishing Your Patterns and How-to's (Pt. 2)

How to Make Seed Bead RingsLike many things in my life, self-publishing is a continual process and I keep learning new things as I go. My latest project Simple Seed Bead Rings You Can Make was the biggest and most elaborate that I've taken on yet. It is so big, as a matter of fact, that my "simple" little how-to grew large enough that it required a table of contents. All of my previous patterns were short and sweet, but my ring tutorial gave directions to make 5 different rings, with some of them calling back on previously learnt techniques. With the digital format, it's very simple to create a clickable link in the document that allows the user to go right to the point that you are talking about. 

For example, I demonstrated how to to add an extra row of beads to a ring. In another design, part of the pattern calls for the reader to ad an extra row. Instead of having to write out the instructions again, I created a bookmark to the instructions I wrote previously and create a link in the document highlighting the words "ad an extra row". Now, if the reader already knows how to do it, great! They can pass by it. But, if they forgot, or haven't done it already, it's easy to find in a simple click.

It is very easy to set up bookmarks and a table of contents (ToC as it's called). I found this article posted in the Amazon forums on how to format your book that is sure to help. It is written for those using Word, but if you are like me and don't have this program, not to worry. I found a program called Open Office. It is a free program that you can download from their website.  It offers all the same features as Microsoft Word. The bookmark feature that you need to automatically create the links and Table of Contents (ToC), operates in the exact same way.


Another very valuable lesson I learnt with my latest project - Shrink your photos! My new tutorial has over 100 photos and when left them in their original size, the document I created was so huge is was almost embarrassing. I recommend that you make your photos no larger than 300 pixels square. The eReaders shrink your photos even further but this size will give you enough to work with and still be manageable. 

After I realised my photo mistake, I went back to edit and save my photos twice. The first was to crop them to eliminate any extraneous background from the photos, and to save them in a new file. I then shrunk them to be no bigger than 260 pixels wide (just to be safe and to make my document that much more manageable) and saved them AGAIN in another folder marked smalls.

I did this for two reasons: the first was to create the ebook. The second is that I want to have my pattern available to users of Amazon Prime, especially for the holidays coming up.   For a publisher, this is listed as the KDP Select program and I will let you know how this goes for me. 

But back to my point.  One of the stipulations to have a book in the Amazon Prime program is that it has to be exclusive to Kindle. There can't be a digital copy for sale anywhere else, including Etsy, ArtFire, Barnes and Noble, iTunes, etc. BUT you can still sell hard copies AKA books. What I plan to do is reformat my ring how-to and then print and sell the booklet. This means I can use larger photos than I did for my ebook and why I save them in two sizes.

It's also important to remember, that not all of the readers (i.e. Kobo, Kindle) are in colour. Depending on what your photos show or demonstrate, you may need to take into consideration the contrast between colours when they appear in black and white. 

I also wanted to give a quick update on how things went with Smashwords. Great news!! I am now officially on most of the devices that are out there because of them!  I'm on Barnes and Noble, iTunes and Diesel. I am still not on Kobo. To date have sold 1 copy and looking at my stats at Smashwords, I haven't got a whole lot of paritial downloads either.  I guess something is better than nothing.

As far as Lulu.com is concerned, they rejected my submitted patterns because they didn't have a table of contents. It would be easy enough to make one, now that I know how, but since I'm already listed on Barnes and Noble and iBookstore, I see no reason to go back to edit them.

By far the most successful platform I'm selling on is Kindle. As I stated in Part 1 of my self-publishing adventures, I went directly through this one.  As of right now, I usually sell 3-4 patterns a week. Lately, my bracelet how-to has taken off and I sell 1 every few days and sometimes more. I'm not sure if it's because of the upcoming holiday and people want to make gifts or if it's something else. To be honest, the "why" really isn't that important to me. I'm just happy that this is working!

To continue on my self-publishing journey, please continue on to Part 3.

Friday, 16 December 2011

Seed Bead Rings You Can Make

Design your own ring with this bead graphing paper.

Thanks for stopping by my page.  I hope you are enjoying the seed bead ring tutorial. If you haven't seen it yet, you can use the link below to check it out on Kindle.  Don't have a Kindle?  No problem!  You can always download it to your computer and read it using amazon's free app.

The following are the rings that my how-to teaches you to make:


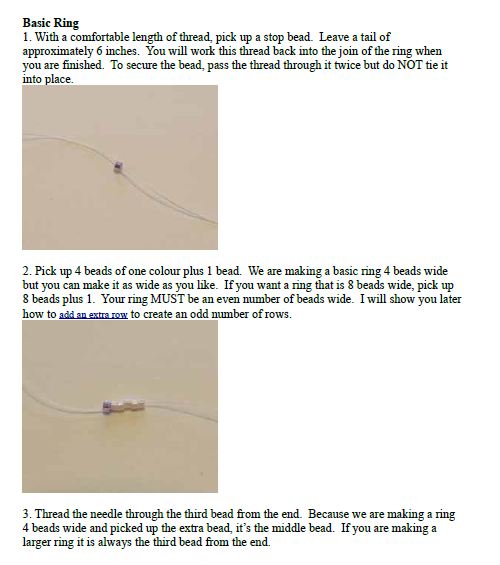
I know some folks like to see a little of what they are going to get so here are a few sample pages.


Related Posts.